[Day7] Typescript Basic

타입스크립트에 대한 기초를 탄탄히 다질 수 있는 시간이었다. 몇 달 전에 외부 동아리 면접을 볼 때 타입스크립트 질문을 받았는데 답변하지 못했던 기초도 오늘 다시 한번 공부할 수 있었다.
타입스크립트 기초는 기존 페이지에 잘 정리가 되어있어서 나중에 공부할 때 같이 보면 좋을거같아서 첨부해둔다.
TypeScript
TS?
- 타입스크립트는 자바스크립트에 타입을 부여한 언어
- 자바스크립트의 확장된 언어라고 볼 수 있다.
- 자바스크립트와 달리 브라우저에서 실행하려면 파일을 한번 변환해주어야 한다. 이 변환 과정을 컴파일(complile) 이라고 부른다.
Why TS?
w3schools에 따르면 ….
JavaScript는 느슨한 타입 언어입니다. JavaScript에서 어떤 유형의 데이터가 전달되는지 이해하기 어려울 수 있습니다. JavaScript에서 함수 매개변수와 변수는 정보가 없습니다! 그래서 개발자는 설명서를 보거나 구현에 따라 추측해야 합니다. TypeScript를 사용하면 코드 내에서 전달되는 데이터 유형을 지정할 수 있으며 유형이 일치하지 않을 때 오류를 보고할 수 있습니다. 예를 들어, TypeScript는 숫자를 기대하는 함수에 문자열을 전달할 때 오류를 보고합니다. JavaScript는 그렇지 않습니다.
Type Assignment
Explicit Type
type을 명시적으로 작성
1
let firstName: string = "Dylan";
Implicit Type
할당된 값을 기반으로 유형을 “추측”
1
let firstName = "Dylan"; // firstName을 string으로 추측한다.
Unable to Infer
- TypeScript는 항상 변수의 유형을 제대로 추론하지 못할 수 있다.
- 그런 경우, type 체크를 비활성화시키는 any로 타입을 설정합니다.
1
2
const json = JSON.parse("55");
console.log(typeof json); // number
TypeScript Special Types
any
유형 검사를 비활성화하고 모든 유형이 사용될 수 있도록 하는 유형
💡 ts를 쓰는 목표를 잃어버리는 것이기 때문에 특수 상황이 아니고서는 추천하지 않음 💡
1
let v: any = true;
unknown
- 데이터 유형을 모를 때 가장 잘 사용
- 나중에 유형을 추가하려면 캐스팅해야 한다. “as” 키워드 사용
- any보다 더 안전한 대안
1
2
3
let u : unknown = true;
u = "string"; // no error
Math.round(u); // error
undefined & null
1
2
3
4
5
6
7
8
let y: undefined = undefined;
console.log(typeof y); // undefined

let z: null = null;
console.log(typeof z); // object

let x: null;
console.log(x); // undefined
TS Arrays
1
2
3
4
const names: string[] = [];

names.push("Dylan"); // no error
// names.push(3); // Error: Argument of type 'number' is not assignable to parameter of type 'string'.
Readonly
오직 읽기만 가능한 배열로, push라는 속성은 존재 하지 않는다.
1
const names: readonly string[] = ["Dylan"];
TS Tuples
tuple은 각 인덱스에 대한 길이와 타입이 정의된 타입 배열
1
2
let ourTuple: [number, boolean, string];
ourTuple = [5, false, 'Coding God was here'];
 💡 useState는 길이와 타입이 고정된 tuple임 ! 💡
Named Tuples
각 인덱스 값에 대한 내용을 제공
✅ 해석이 가능한 맥락을 제공하는 것이지 변수로 호출은 불가능
1
2
const graph: [x: number, y: number] = [55.2, 41.3];
console.log(x); // error Can find name "x"
TS Object Types
1
2
3
4
5
const car: { type: string, model: string, year: number } = {
  type: "Toyota",
  model: "Corolla",
  year: 2009
};
Optional Properties
개체 정의에서 반드시 정의할 필요가 없는 선택 속성
1
2
3
4
const car: { type: string, mileage?: number } = {
  type: "Toyota"
};
car.mileage = 2000;
Index Signatures
동적인 property 이름을 가질 때 사용
🔹 properties 표현 방법 : [prop name : prop type]
1
2
3
const nameAgeMap: { [index: string]: number } = {};
nameAgeMap.Jack = 25; // no error
nameAgeMap.Mark = "Fifty"; // Error: Type 'string' is not assignable to type 'number'.
TS Enums
열거형은 상수 그룹을 나타내는 특수한 “class”
Numeric Enums
기본적으로 열거형은 첫번째 값을 0으로 초기화하고 추가 값마다 1을 더한다.
1
2
3
4
5
6
7
8
enum CardinalDirections {
  North,
  East,
  South,
  West
};
console.log(CardinalDirections.North); // 0
console.log(CardinalDirections.West); // 3
[CardinalDirections을 콘솔로 찍은 값] 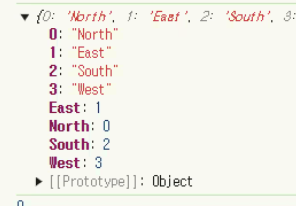
🔹 특정 값을 설정해주면 추가값마다 1이 증가한다.
1
2
3
4
5
6
7
8
enum CardinalDirections {
  North,
  East = 3,
  South,
  West
};
console.log(CardinalDirections.North); // 0
console.log(CardinalDirections.West); // 5
String Enums
💡 숫자 열거형보다 문자 열거형을 더 권고한다. 💡
1
2
3
4
5
6
7
8
enum CardinalDirections {
  North = 'North',
  East = "East",
  South = "South",
  West = "West"
};
console.log(CardinalDirections.North); // logs "North"
console.log(CardinalDirections.West); // logs "West"
Type Aliases
사용자 정의 이름(별칭)으로 type을 정의할 수 있다.
1
2
3
4
5
6
7
8
9
10
11
12
13
14
15
16
17
type CarYear = number
type CarType = string
type CarModel = string
type Car = {
  year: CarYear,
  type: CarType,
  model: CarModel
}

const carYear: CarYear = 2001
const carType: CarType = "Toyota"
const carModel: CarModel = "Corolla"
const car: Car = {
  year: carYear,
  type: carType,
  model: carModel
};
Interfaces ⭐️⭐️⭐️⭐️⭐️
type aliases와 비슷하지만, object에만 적용된다.
✅ 즉, 인터페이스란? 객체의 타입
1
2
3
4
5
6
7
8
9
interface Rectangle {
  height: number,
  width: number
}

const rectangle: Rectangle = {
  height: 20,
  width: 10
};
Extending Interfaces
1
2
3
4
5
6
7
8
9
10
11
12
13
14
interface Rectangle {
  height: number,
  width: number
}

interface ColoredRectangle extends Rectangle {
  color: string
}
// 동일한 속성에 새로운 기능을 더한다.
const coloredRectangle: ColoredRectangle = {
  height: 20,
  width: 10,
  color: "red"
};
✅ 템플릿 리터럴 ⭐️⭐️⭐️ console.log(My status code is ${code}.)
TS Function
Return Type
함수에서 반환되는 값의 유형은 명시적으로 정의될 수 있다.
1
2
3
function getTime(): number {
  return new Date().getTime();
}
Void Return Type
void type은 아무 값도 반환하지 않을 때 사용된다. (return하지 않을 때)
Parameters
1
2
3
function multiply(a: number, b: number) {
  return a * b;
}
Optional Parameters
매개변수를 명시적으로 선택사항으로 표시할 때 “?”를 사용한다.
1
2
3
function add(a: number, b: number, c?: number) {
  return a + b + (c || 0);
}
Named Parameters
1
2
3
4
5
6
7
8
9
// 구조 분해 할당
function divide({dividend, divisor} : {dividend: number, divisor: number} ) {
  return dividend / divisor;
}
const obj = {
  dividend: 100,
  divisor: 2,
}
console.log(divide(obj));
Rest Parameters
rest param은 항상 배열이므로 형식은 배열이어야 한다.
1
2
3
4
function add(a: number, b: number, ...rest: number[]) {
  return a + b + rest.reduce((p, c) => p + c, 0);
}
console.log(add(10,10,10,10,10));
✅ 스프레드 연산자 : 합해져있는 애를 펼침
✅ rest param : 낱개로 있는 애들을 합침
Type Alias
함수 type은 type 별칭을 사용해 별도로 지정할 수 있다.
1
2
3
type Negate = (value: number) => number; // type alias
const negateFunction: Negate = (value) => value * -1;
console.log(negateFunction(10));
TypeScript Casting
Casting with “as”
변수를 캐스팅하는 간단한 방법은 “as” 키워드를 사용하는 것이다.
이 키워드는 주어진 변수의 유형을 직접 변경한다.
1
2
3
let x: unknown = 'hello';
console.log(x.length); // error -> unknown으로 타입을 지정해놨기 때문
console.log((x as string).length); // 명시적으로 타입을 바꿈.
⭐️ 캐스팅은 실제로 변수 내의 데이터 형식을 변경하지는 않는다. ⭐️
Casting with “<>”
”<>”를 사용하는것도 “as”와 동일하게 작동
1
console.log((<string>x).length);
⭐️ 이러한 유형의 캐스팅은 React 파일 작업 시와 같이 TSX에서는 작동하지 않는다. (tsx: ts가 표현된 react)⭐️
TypeScript Class
class ?
클래스는 객체를 생성하기 위한 템플릿이다.
class를 통해 원하는 구조의 객체 틀을 짜놓고, 비슷한 모양의 객체를 공장처럼 찍어낼 수 있다.
쉽게 생각해서 클래스 = 붕어빵 기계, 그리고 객체 = 붕어빵 으로 보면 된다.
✅ class는 복합데이터를 표현하는 프로그램 단위
복합 data란?
Members : Types
1
2
3
4
5
6
7
8
class Person {
  name: string;
  age: number;
}
const person = new Person();
person.name = "Jane";
person.age = 30;
console.log(person) // Person {Jane : 30}
Members: Visibility
🔹 세 가지 주요 visibility modifiers
- public - (default) 어디에서나 클래스 멤버에 액세스할 수 있도록 허용합니다.
- private - 클래스 내부에서만 클래스 멤버에 대한 접근을 허용합니다.
- protected - 상속 섹션에서 다루는 내용에 따라 자체 및 이를 상속하는 모든 클래스에서 클래스 멤버에 대한 액세스를 허용합니다.
Parameter Properties
TypeScript는 매개변수에 visibility 수정자를 추가하여 생성자에서 클래스 멤버를 정의하는 편리한 방법
1
2
3
4
5
6
7
8
9
10
11
12
13
14
15
16
17
18
19
20
21
22
23
24
25
class Person {
  private name: string; // member data

  constructor(name: string) {
    this.name = name; // local data
  }
  public getName(): string {
    return this.name;
  }
}

// 위 아래 코드가 동일한 의미의 코드이다.
// constructor param에 visibility를 명시하면 클래스 바디에 인스턴스 변수 생략 가능하다.

class Person {
  public constructor(private name: string) {}

  public getName(): string {
    return this.name;
  }
}

const person = new Person(); // 생성자 : 객체의 초기화 시점에 호출되는 메서드
person.name = "Yeeun";
console.log(person);  // Person { name: 'Yeeun' }
Readonly
private : 외부에서 보이냐 안보이냐 “visibility”
readonly : 값의 변경. 상수화 할것이냐 안할것이냐의 문제 !
👉 수업 막바지에 들어온 질문 :
Q. 프론트엔드 실무에서 class와 같이 객체지향 프로그래밍이 많이 활용되는지 궁금합니다! A. 리액트를 사용할 때 hook을 짜는데 class를 사용하는것이 불편함!
그래서 class의 인기가 사그라들고 function쪽으로 가게됨.
Reference
이 포스트는 아래 게시글의 정보 및 이미지가 사용되었습니다.